


Introduction to HTML Required Attribute
It can be stated as the Boolean attribute sometimes termed as compulsory or mandatory fields with developers-friendly. It should be marked by any form of control to have a value that shouldn’t be kept blank before any form is submitted on a webpage. That can be done by providing the attribute at the end of the input field, which we like to make required. The clients would be notified by a popup alert saying the required field should be filled; meanwhile, it’s new to HTML5 and also works well with input fields like checkbox, radio buttons, texts, etc., probably helps in front-end validation.
This article covers basic concepts on required attributes with simple examples to start and get work in browsers like Chrome 6, Firefox, opera, and each of these browsers has a different default behavior. Actually speaking, attributes being a special word provides functionality to any element in the HTML. As with HTML5, the required attributes are visible as a UI helper. When a user submits a form, either it includes data or not, the server performs the validation when a request is received.
Syntax
The syntax is given below, and a slight change you can do to is making the text input field as with the keyword ‘Attribute ‘in the forms. It is mandatory in a form to set a field to be filled before submitting a form. To do so, ‘required’ attributes are given.
General Syntax: The possible values used here are either null or required.
<element required>
The syntax for Input element:
< input type =” “ required>
Syntax for Text area: <text area required >
<text area rows =” “ cols = “ “ name =” “ required> < /text area>
The syntax for Select Area:
<select name =” “required>
<option value >
</option> </select>
What is the HTML Required Attribute?
It is said that HTML5 has a number of attributes as Boolean, which represents true value and false value Ok, now let’s start with the explanation on this. They permit us to do the following:
- If fields are left empty, stop the submission of the form.
- On any unchecked field, provide a notification message.
The Html required attribute is applied to the most frequently used three elements, which are listed below: They are
- <input>: This attribute is specified in <input> elements. This field includes various input types like email, text, radio, checkboxes, URL.
- <text area>: This element holds an unlimited number of characters displayed with fixed-width size. And the text area is determined by no. of <cols> and <rows>, which is displayed at the same time. If it is with CSS, the properties of height and width are described. HTML5 text area has attributes like autofocus, placeholder, form, max length, required, wrap.
- <select>: Html select element prompts to select from the list by the user by adding a simple pattern “ required” with an empty value.
Examples of HTML Required Attribute
Let’s try out the HTML code to learn Required Attributes in an HTML. First, we shall go with the <input> attribute.
1. <input> Attribute: Required Field
To mark a field as simple is to add the “required “attribute into the input element. The below code shows how the required field works in a browser when the fields are filled upon submission. Let’s see adding the required attribute wherever it is appropriate.
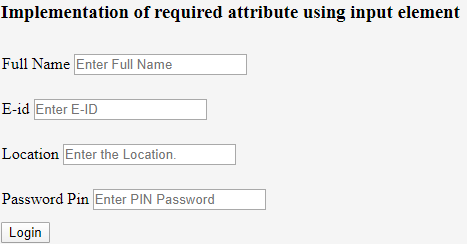
Example #1
Code:
<html>
<head>
<h3>
Implementation of required attribute using input element
</h3>
<style>
div
{
padding: 12px 1;
}
</style>
<head>
<body>
<form>
<div>
<label> Full Name</label>
<input type="text" placeholder="Enter Full Name" name="name" required>
</div>
<div>
<label> E-id </label>
<input type="email" placeholder="Enter E-ID" name="email" required>
</div>
<div>
<label> Location </label>
<input type="text" placeholder="Enter the Location." name="Loc" required>
</div>
<div>
<label>Password Pin</label>
<input type="password" placeholder="Enter PIN Password" name="pwd" required>
<br>
</div>
<button type="submit" VALUE="SUBMIT"> Login </button>
</form>
</body>
</html>
Output:
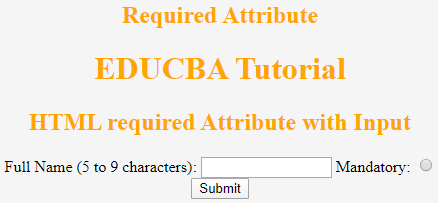
Example #2
Implementation with Radio Button-Detecting whether a radio button is not checked.
Code:
<!DOCTYPE html>
<html>
<head>
<h2>
Required Attribute
<h2>
<style>
h1,
h2 {
color: Orange;
font-style: Verdina;
}
body {
text-align: center;
}
</style>
</head>
<body>
<h1>EDUCBA Tutorial</h1>
<h2>
HTML required Attribute with Input
</h2>
<form action="">
<label for="name"> Full Name (5 to 9 characters): </label>
<input type="text" id="name" name=" Full name" required
minlength="5" maxlength="9" size="14">
Mandatory:
<input type="radio"
name="radiocheck"
required>
<br>
<input type="submit">
</form>
</body>
</html>
Output:
2. <Text Area> Attribute
This Boolean attribute specifies that the text area element should never leave alone before submitting also specifies multi-line input control. The below example illustrates the use of this attribute outside the form.
Code:
<!DOCTYPE>
<html>
<head>
<title>Required Attribute implementation</title>
<style>
h1
{
color: brown;
font-style: Arial;
}
body {
text-align: center;
}
</style>
</head>
<body>
<h1> Text Area Required Attribute</h1>
<form action="updates.jsp" id="user idform">
E-mail id: <input type="text" name="username">
<input type="submit">
</form>
<br>
<textarea rows="10" cols="60" name="comment" form="user idform">
Enter text here... </textarea>
Output:

Even in the above example, we can specify it using the min length and max length attribute.
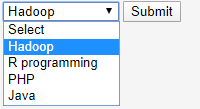
3. <select > Attribute
The below example demonstrates the required attribute with the usage of <select attribute>. It allows a browser to make a selection from the form control and to submit.
Example #1
Code:
<!DOCTYPE html>
<html>
<body>
<form action="/act_page.php">
<select required>
<option value="">Select</option>
<option value="Air India">Hadoop</option>
<option value="Emirates"> R programming</option>
<option value="Doha">PHP</option>
<option value="Spice Jet"> Java</option>
</select>
<input type="submit">
</form>
</body>
</html>
Output:
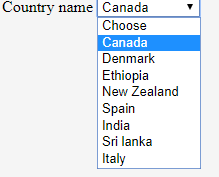
Example #2
Below example is not valid as the first child element got empty value attribute. In the line 5 I have mentioned <option> choose. To make the code valid make <option value=””>Choose</option>.
Code:
<form action="#" method="post">
<div>
<label for="Country">Country name</label>
<select required aria-required="true" id="Country" name="Country">
<option>Choose</option>
<option value=" CN"> Canada</option>
<option value="DM">Denmark</option>
<option value="ETH">Ethiopia</option>
<option value="NZ">New Zealand</option>
<option value="sa">Spain</option>
<option value="IND">India</option>
<option value="SL">Sri lanka</option>
<option value="It">Italy</option>
</select>
</div>
</form>
Output:
Conclusion
It helps in defining the state of the input field and seeks the browser to validate the client-side input field. Being a fantastic element in HTML5 makes easy on client-side form validation and provides better enhancements for users. With their instant methods with just one piece of validation improves user – interaction.
Recommended Articles
This is a guide to HTML Required Attribute. Here we discuss the basic concept, syntax, and various examples of HTML required attributes with proper codes and outputs. You can also go through our other related articles to learn more –


1 Comments
This information is good
ReplyDelete